
With spring upon us, it’s time to encourage the children to let their green fingers loose!
These tin planters are fun and easy to make. All you need is the following:
Tin Cans
Large Google Eyes
Scissors
Glue Gun/Strong Adhesive
A Selection of Decorations such as Pompoms, Jewels, Buttons, Foam shapes etc.
Potting Compost
Seeds such as herbs, cress etc.
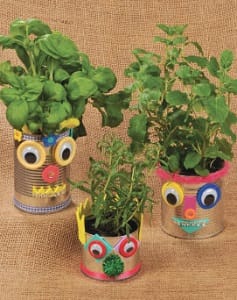
To make a Tin Can Planter
- Before you begin, make sure your tin can is clean and dry.
- Gather together a mixture of decorations. Lay them out on a table and get the children to try out different design ideas – but do not glue anything on just yet!
- When they have chosen a suitable design, help them stick the decorations onto the tin can. The glue gun can get very hot so should not be operated by a child. You might like to repeat Steps 1 & 2 to make more than one. You could even have a tin can planter family!
- Carefully fill the can with potting soil. Plant some seeds then add a little water to moisten the soil. Place the planter on a sunny windowsill and continue to water as necessary. Keep watch for the first green shoots to appear!
This great project has been supplied by Creative Steps magazine – fun ideas for everyone caring for young children. Each issue of Creative Steps contains dozens of fun, inspiring ideas to help you encourage learning through creative play.
Get an exclusive 33% discount on an annual subscription with Creative Steps by using promo code EYRXT33 at: https://creativesteps.imbmsubscriptions.com/eyrxt33/.
We would love to see how you get on! Send us pictures of your masterpieces on Facebook, Instagram or Twitter and don’t forget to use the hashtag #EYRhub.